Web: Filtering
Opendium systems analyse each web request in a variety of ways to heuristically categorise it. In addition to analysing unencrypted traffic, encrypted HTTPS traffic will be decrypted, analysed and filtered in real time. The traffic can be restricted based on the categorisation that the system has determined for each web request.
The web filter works on three levels:
- Blocked Categories - This is the primary method of filtering. The system categorises content as it is being accessed and blocks content which is deemed to belong to an unacceptable category according to the user group's settings. If certain web content is being incorrectly categorised or not categorised at all, the first thing to do is edit the Filtering Categories manually exclude the content from categories it does not belong to, and include it in categories that it does belong to.
- Enforcement of Safe Search - The web filter can demand that some search engines, such as Google, enable strict Safe Search irrespective of the user's own preferences.
- Overrides - These are used to completely disable parts of the filtering system. If certain web content is being incorrectly categorised, it is recommended that you edit the appropriate categories rather than using an override to disable the filtering entirely.
Blocked categories
In the Blocked Categories subsection of the Web tab, you can configure which categories of website are blocked. There is a selection of predefined categories and we provide regular updates to the criteria used to categorise websites into these categories. You can also create new categories as you see fit, and you can modify the categorisation criteria for both the predefined and user defined categories yourself. For the time being, we will concentrate just on using the predefined categories - refer to Filtering Categories for more information on creating and altering the categories themselves.
These are heritable settings (see Group Inheritance). If you are not sure which settings would be applied to a user, look at the Policy Modelling report.
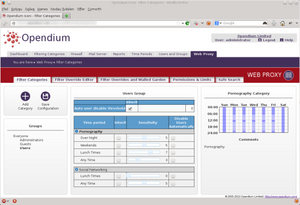
Once you have selected a group, you can use the Add Category button to restrict certain categories. Select the categories you would like to restrict and click Ok and they will appear in the centre column of the page. You will note that each category has a Sensitivity control - we recommend starting with this in the middle to begin with. If you find that too much is being blocked then reduce the sensitivity a bit, and if you find that not enough is being blocked you can try increasing it. If there is just one website that is consistently being miscategorised, you can edit the category itself to exclude that website.
For certain categories, you may want the system to automatically disable a user's web access entirely if they are repeatedly blocked, and this can be achieved by ticking the Disable Users Automatically box and setting the Auto user disable threshold slider appropriately.
Once you are happy with the group's settings, press the Save Configuration button.
As described above, when you place a restriction on a group, this will also be inherited by all its descendent groups, unless explicitly overridden. If you need to override the inherited settings, untick the Inherit box of the setting and adjust it as appropriate. To completely disable a category's filtering, simply turn the sensitivity all the way down.
Safe search
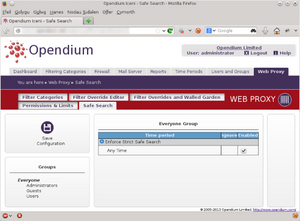
The web filter can demand that some search engines, such as Google, enable their strict Safe Search filters, irrespective of the user's own preferences. As with the other filtering settings, this can be done on a per-group basis. To configure this, go to the Safe Search subsection of the Web tab.
These are heritable settings (see Group Inheritance). If you are not sure which settings would be applied to a user, look at the Policy Modelling report.
Once you are happy with the group's settings, press the Save Configuration button.
As described above, this setting will also be inherited by all the descendent groups, unless explicitly overridden. If you need to override the inherited settings, untick the Inherit box of the setting and adjust it as appropriate.
The YouTube Restricted Mode settings work in a couple of different ways, depending on whether the school has a Google domain or not:
- For schools without a Google domain, these settings limit access to inappropriate YouTube content.
- For schools with a Google domain, these settings prevent users that aren't logged into their school Google account from accessing inappropriate YouTube content. Once the user logs into their school Google account, the restrictions which have been set on the Google domain take over. This allows schools fine grained control over which YouTube content is allowed or blocked through the school's Google domain.
Overrides
Overrides can be used to completely disable certain aspects of the web proxy. For example, here are a few of the ways that overrides can be used:
- Disabling HTTPS decryption for applications which are incompatible with HTTPS decryption.
- Disabling authentication for applications which are incompatible with authentication.
- Allowing websites in a walled garden configuration.
- Whitelisting websites that must never be filtered, such as the school's own website.
Although whitelisting is one possible use, if certain content is being incorrectly categorised, whitelisting is not recommended unless the content is under the school's control. Whitelisting a website will disable all filtering, whereas it is usually better to just exclude it from the appropriate categories so that it can still be filtered by other categories as appropriate.
Note that by default, whitelisted websites will still be decrypted so that information can still be recorded for reporting purposes.
Please see Filtering Rationale for more information regarding the predefined overrides.
Editing
To edit or create overrides, go to the Override Editor subsection in the Web tab.
The system has a selection of predefined overrides, to which we provide regular updates. Each predefined override has a description explaining what it is for.
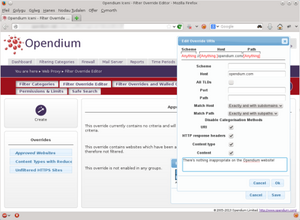
In order to create an override, click the Create button. Give it a descriptive name, such as "Staff Whitelist" and select which parts of the filtering system to disable. You can also include a descriptive comment explaining what the override is for.
You can right click on any override to add criteria that determines what is included in that override. For example, you can add a number of URIs, or content types that you want to disable filtering on and record a comment for each.
Once an override has been created, it must be enabled for the appropriate user group (see below).
Applying
To apply an override to a group, go to the Filter Overrides & Walled Garden subsection in the Web tab.
These are heritable settings (see Group Inheritance). If you are not sure which settings would be applied to a user, look at the Policy Modelling report.
Once you have selected a group, you can use the Add Override button to choose overrides to apply to that group. Select the overrides you would like to apply and click Ok and they will appear in the centre column of the page.
As described above, this setting will also be inherited by all the descendent groups, unless explicitly overridden. If you need to override the inherited settings, untick the Inherit box of the setting and adjust it as appropriate.
Walled garden
In some cases, it is useful for a school to block access to everything except a handful of approved websites.
In order to do this, go to the Filter Overrides & Walled Garden subsection in the Web tab and select an appropriate group. Enable the Walled Garden and Allowed in Walled Garden overrides.
Websites to be allowed should be added to the Allowed in Walled Garden override. Note that these websites will still be categorised and filtered according to the Blocked Categories settings, and by default, websites listed in the Whitelist and Essential Services overrides will also be allowed.
Time periods
You will notice that, as you were setting up the categories, safe search and overrides, each setting says "Any Time" next to it. Up until now, all the settings that have been described have remained the same at all times of the day. But what if you want different restrictions placed upon the users at different times of the day or different days of the week? Maybe you would like to restrict access to social networking websites through most of the day, but allow access to them at lunch times?
Opendium systems have a powerful concept of Time Periods. By default, there is a single time period called "Any Time", but you can create additional time periods that define times that are important to your organisation. For example, you can create a "Lunch Times" period that applies from 12:30 until 13:30 on week days, and a "Weekends" period that applies at the weekend. Please read Time Periods for information on how to create and edit time periods.
Once you have created additional time periods, you can display them by pressing the + button in the relevant setting. The right hand column will also display a calendar indicating the current configuration. The settings for the highest priority time period that is enabled and active at any given time determines which settings are used.


