Mail: Filtering
The Opendium system analyses each email that passes through it to detect spam, viruses and to categorise the mail's content in order to filter out inappropriate emails.
Antispam
A variety of techniques are employed to detect and block spam email. As a first line of defence, suspicious emails are greylisted. This is very effective, requires no maintenance and almost never causes any legitimate email to be lost. Secondly, the system can be configured to use DNS blackhole lists (DNSBL), otherwise known as real-time black hole lists (RBL) to reject email from known sources of spam. Then, the contents of each email itself are analysed and emails that look extremely spammy are rejected outright whilst emails that are more marginal are delivered to the recipient's Spam mail folder*.
* If mail is being redirected to another server, spam email cannot be moved into a separate folder, and will instead have X-Spam-Status and X-Spam-Score-Level headers inserted, showing the results of the spam analysis. You should configure your mail server to deliver mail to the recipients' Spam folder according to those headers.
The spam system largely requires no configuration. However, in the Antispam subsection of the Mail tab, you can configure which DNS blacklists and whitelists to use. We recommend using the Spamhaus Block List and Exploits Block List (sbl-xbl.spamhaus.org) and the SpamCop Blocking List (bl.spamcop.net). Please check Spamhaus's terms and conditions to see if you meet their free usage terms. You may also like to add list.dnswl.org as a whitelist - again, please check the dnswl.org terms and conditions to see if you qualify for free usage of this whitelist.
Antivirus
The mail server module incorporates an antivirus system, which will block any email that contains malware. There is no configuration required for the antivirus engine, but you can check when the virus definitions database was last updated by looking in the Antivirus subsection of the Mailserver module.
Blocked categories
The system categorises emails by analysing their contents and blocks any emails which are deemed to belong to an unacceptable category according to the settings of the user groups of both the senders and recipients.
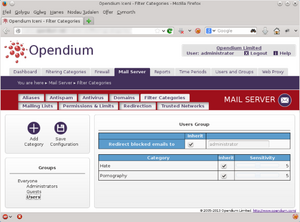
In the Blocked Categories subsection of the Mail tab, you can configure which categories of content are blocked. There is a selection of predefined categories and we provide regular updates to the criteria used to categorise websites into these categories. You can also create new categories as you see fit, and you can modify the categorisation criteria for both the predefined and user defined categories yourself. For the time being, we will concentrate just on using the predefined categories - refer to Filtering Categories for more information on creating and altering the categories themselves.
These are heritable settings (see Group Inheritance). If you are not sure which settings would be applied to a user, look at the Policy Modelling report.
Once you have selected a group, you can use the Add Category button to restrict certain categories. Select the categories you would like to restrict and click Ok and they will appear in the centre column of the page. You will note that each category has a Sensitivity control - we recommend starting with this in the middle to begin with. If you find that too much is being blocked then reduce the sensitivity a bit, and if you find that not enough is being blocked you can try increasing it.
When an email is blocked, the sender will receive an error message and the original mail will be sent to the Redirect blocked emails to address if it is set at the top of the Blocked Categories page.
Once you are happy with the group's settings, press the Save Configuration button.
As described above, when you place a restriction on a group, this will also be inherited by all its descendent groups, unless explicitly overridden. If you need to override the inherited settings, untick the Inherit box of the setting and adjust it as appropriate. To completely disable a category's filtering, simply turn the sensitivity all the way down.
